Install & setup
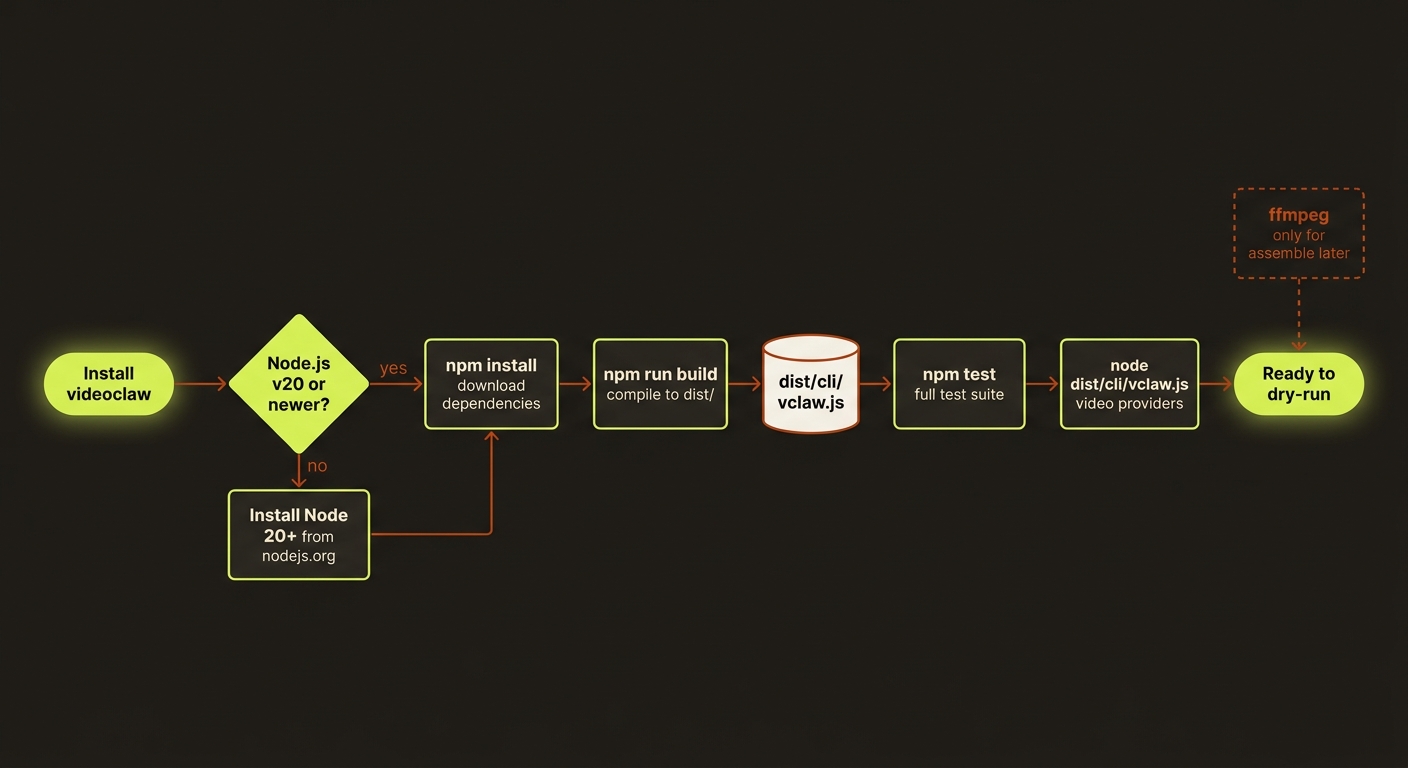
Diagram source (live Mermaid)
Before you can make a single video, you need videoclaw running on your machine. Good news: this is the easy part, and it costs nothing. You don't need any API keys, you don't need any video-provider accounts, and you won't spend a cent. This page gets the tool installed, builds it, and proves it works — all in a few copy-paste commands.
You can do everything in "dry-run" first
Almost every command in this guide has a --dry-run flag (a "rehearse without spending money" switch). With dry-run you can walk the entire pipeline — idea, brief, storyboard, plan — without keys and without cost. So feel free to follow along even before you sign up for any AI video service.
What you need first (prerequisites)
You need just one thing to start:
- Node.js version 20 or newer. Node.js is the program that runs videoclaw. If you don't have it, download the "LTS" version from nodejs.org. To check what you have, run the command below.
There's a second tool, ffmpeg, that you only need later — when you ask videoclaw to actually stitch real clips, narration, and music into a finished MP4. You do not need it to install, build, or rehearse anything. We'll point you to it when the time comes (see the assemble guide). For now, skip it.
node --versionPrints your Node.js version. You want v20. or higher. If you see a lower number or "command not found", install Node 20+ before continuing.
Get the code and build it
videoclaw is shipped as source you build on your own machine. Three commands do the whole job: download the dependencies, compile the tool, and run the test suite to confirm it's healthy.
Why a "build" step? (one-line gloss)
videoclaw is written in TypeScript, a typed flavor of JavaScript. "Building" just translates that source into the plain JavaScript that Node.js runs, dropping it into a dist/ folder. You run the built version, never the source directly.
npm installDownloads all the libraries videoclaw depends on. Run this once after you get the code. Expect a node_modules/ folder to appear and a "added N packages" summary at the end.
npm run buildCompiles the TypeScript into runnable JavaScript under dist/. Expect no errors and a fresh dist/ folder containing dist/cli/vclaw.js. Re-run this any time you pull new code.
npm testRebuilds, then runs the full test suite. Expect a long list of passing tests ending in a "pass" summary with zero failures. This confirms your copy works end to end.
The one thing to remember: how you run commands
Throughout these guides, every command is written in the source-checkout form:
node dist/cli/vclaw.js video providersThis is how you run videoclaw from a freshly built source copy. It points Node.js at the compiled CLI.
If you instead installed videoclaw as a published package (so the vclaw command is on your PATH), you can drop the node dist/cli/vclaw.js part and just type vclaw. The two are interchangeable:
vclaw video providersThe installed-package shortcut. Everywhere you see node dist/cli/vclaw.js in this guide, an installed user can simply write vclaw. Same command, shorter to type.
Remember this once
node dist/cli/vclaw.js ... (source checkout) and vclaw ... (installed package) are the same tool. Pick whichever matches how you set things up — we won't repeat this note on every page.
Verify your install (no keys needed)
Now prove it all works. This command reports your environment and which AI video routes are ready — and it needs no API keys at all to run.
node dist/cli/vclaw.js video providersShows each provider route (Veo, Seedance, Runway, Dreamina) and whether it's wired up and ready. Expect a readable list of routes with a readiness status next to each. Routes you haven't configured will simply show as not-ready — that is completely fine right now. You're confirming the tool runs and can see its providers, not that any provider is live yet.
A "not ready" route is normal at this stage
Seeing routes marked not-ready does not mean something is broken. It just means you haven't added that provider's keys, which you don't need until you generate a real (non-dry-run) video. videoclaw deliberately tells you the truth here instead of pretending a route is ready — and it will never silently swap one provider for another. More on this in providers.
The all-in-one sanity check (optional)
If you want a single command that builds, runs the tests, and runs the main smoke checks and guardrails in one go, use the packaged pre-flight. This is the recommended check before doing anything serious.
npm run check:release-readiness-liteRuns build + tests + the main end-to-end smoke checks + local guardrails as one command. Expect it to finish with an overall pass. If it passes, your install is solid.
You're set — and you can't break anything yet
That's it. videoclaw is installed, built, tested, and you've confirmed it can see its providers. Because everything that follows can run in --dry-run, you can explore the whole pipeline right now with no keys, no accounts, and no cost.
Next steps
- Make your first video — go from a one-line idea to a planned video in dry-run.
- How it works — the assembly-line view of the whole pipeline.
- Modes — storyboard mode vs. director mode (the "stop and approve" gate).
- Cheat sheet — every command on one page.
- Troubleshooting — if a command above didn't behave.